目录
什么是Protobuf
Protocol Buffer (简称Protobuf) 是一种跨语言、跨平台、可扩展的序列化库,可用于通信协议与数据存储等场景。与 XML相比 Protocol Buffers 更加小巧,更加快速,更加简单。一旦定义了要处理数据的数据结构之后,就可以利用 Protocol Buffers 的代码生成工具生成相关的代码,读取结构化数据甚至可以在无需重新部署程序的情况下更新数据结构。目前Protobuf支持 C++ , C# , Dart , Go , Java , Python多种语言。
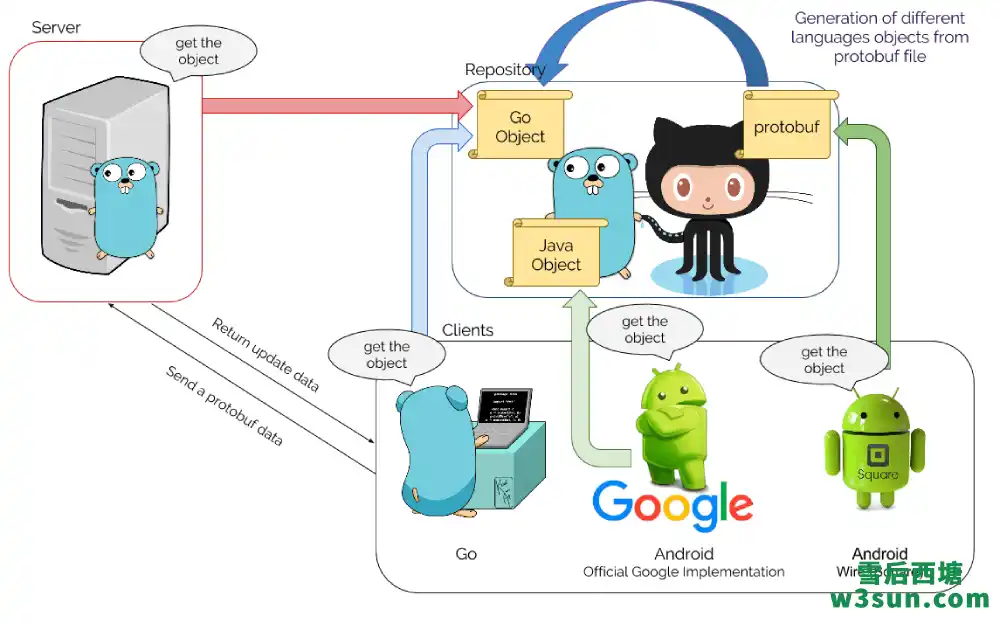
2001年初Protobuf作为混合语言数据标准首先在Google内部使用并于2008年开源,该项目基于BSD开源许可协议。Protobuf公布后逐步地也得到了各家公司的认可,很多开源项目也采用Protobuf进行消息通讯,其中较为著名的就是基于Protobuf的微服务框架GRPC。Google分别于2014年推出了Proto2,随着Protobuf的不断演化,2016年推出了Proto3。 Proto3简化了Proto2的开发,提高了开发的效能,但是也带来了版本不兼容的问题。所以在使用的过程中需要统一Protocol Buffer版本,否则会造成无法成功编译的问题。目前本人所在公司主要将Protobuf应用在结构化数据的序列化与存储方面。
Maven插件整合Protobuf
Maven插件整合Protobuf分为两种情况,一种是本地电脑已经安装Protobuf编译器也就是protoc,另外一种情况是本地未安装protoc。本文将针对上述两种情况给出示例,关于Protobuf的使用请移步其官网:https://developers.google.com/protocol-buffers自行学习,关于本地编译与安装protoc请参考:https://github.com/protocolbuffers/protobuf/blob/master/src/README.md自行完成。
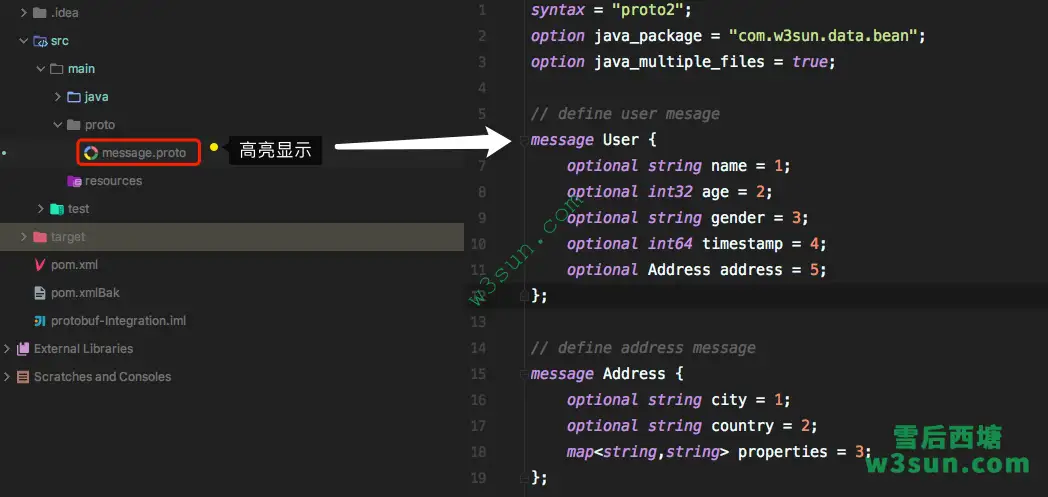
本文中使用和演示的proto定义文件如下:
syntax = "proto2";
option java_package = "com.w3sun.data.bean";
option java_multiple_files = true;

// define user mesage
message User {
    optional string name = 1;
    optional int32 age = 2;
    optional string gender = 3;
    optional int64 timestamp = 4;
    optional Address address = 5;
};

// define address message
message Address {
    optional string city = 1;
    optional string country = 2;
    map<string,string> properties = 3;
};
本地已安装protoc
本地电脑已经安装protoc后可以使用Maven的maven-antrun-plugin插件来生成源文件,maven-antrun-plugin插件参与proto文件的编译过程中不仅可以手动指定proto文件所在位置还可以指定生成的源码文件所在的目标目录,pom.xml具体设置如下:
<?xml version="1.0" encoding="UTF-8"?>
<project xmlns="http://maven.apache.org/POM/4.0.0"
         xmlns:xsi="http://www.w3.org/2001/XMLSchema-instance"
         xsi:schemaLocation="http://maven.apache.org/POM/4.0.0 http://maven.apache.org/xsd/maven-4.0.0.xsd">
    <modelVersion>4.0.0</modelVersion>

    <groupId>com.w3sun.data</groupId>
    <artifactId>protobuf-Integration</artifactId>
    <version>1.0-SNAPSHOT</version>

    <properties>
        <java.version>1.8</java.version>
        <protoc.version>3.0.0</protoc.version>
        <ant.contrib.version>1.0b3</ant.contrib.version>
        <protobuf-java.version>3.0.0</protobuf-java.version>
        <maven-clean-plugin.version>3.1.0</maven-clean-plugin.version>
        <maven-shade-plugin.version>3.1.1</maven-shade-plugin.version>
        <maven-antrun-plugin.version>1.8</maven-antrun-plugin.version>
        <project.build.sourceEncoding>UTF-8</project.build.sourceEncoding>
        <maven-compiler-plugin.version>3.2</maven-compiler-plugin.version>
        <protobuf-maven-plugin-version>0.6.1</protobuf-maven-plugin-version>
        <project.reporting.outputEncoding>UTF-8</project.reporting.outputEncoding>
    </properties>

    <dependencies>
        <dependency>
            <groupId>com.google.protobuf</groupId>
            <artifactId>protobuf-java</artifactId>
            <version>${protobuf-java.version}</version>
        </dependency>
    </dependencies>

    <build>
        <sourceDirectory>${basedir}/src/main/java</sourceDirectory>
        <testSourceDirectory>${basedir}/src/test/java</testSourceDirectory>
        <plugins>
            <plugin>
                <groupId>org.apache.maven.plugins</groupId>
                <artifactId>maven-antrun-plugin</artifactId>
                <version>${maven-antrun-plugin.version}</version>
                <dependencies>
                    <dependency>
                        <groupId>ant-contrib</groupId>
                        <artifactId>ant-contrib</artifactId>
                        <version>${ant.contrib.version}</version>
                        <exclusions>
                            <exclusion>
                                <groupId>ant</groupId>
                                <artifactId>ant</artifactId>
                            </exclusion>
                        </exclusions>
                    </dependency>
                </dependencies>
                <executions>
                    <execution>
                        <!-- 自定义id -->
                        <id>generate-protobuf-sources</id>
                        <!-- 指定绑定的Maven生命周期阶段 -->
                        <phase>generate-sources</phase>
                        <configuration>
                            <tasks>
                                <!-- 自定义提示 -->
                                <echo>Building Protobuf</echo>
                                <!-- 删除proto编译后生成文件所在的目标目录 -->
                                <delete dir="${basedir}/src/main/gen/gen-java"/>
                                <!-- 新建proto编译后生成文件所在的目标目录 -->
                                <mkdir dir="${basedir}/src/main/gen/gen-java"/>
                                <!-- 指定proto定义文件所在目录 -->
                                <path id="proto.path">
                                    <fileset dir="${basedir}/src/main/proto">
                                        <include name="**/*.proto"/>
                                    </fileset>
                                </path>
                                <pathconvert pathsep=" " property="proto.files" refid="proto.path"/>
                                <!-- 需要执行的编译命令,和命令行编译proto文件其实一样 -->
                                <exec executable="protoc" failonerror="true">
                                    <arg value="--java_out=${basedir}/src/main/gen/gen-java"/>
                                    <arg value="-I${basedir}/src/main/proto"/>
                                    <arg line="${proto.files}"/>
                                </exec>
                            </tasks>
                            <!-- 指定生成源文件的source目录 -->
                            <sourceRoot>${basedir}/src/main/gen/gen-java</sourceRoot>
                        </configuration>
                        <goals>
                            <goal>run</goal>
                        </goals>
                    </execution>
                </executions>
            </plugin>
            <plugin>
                <groupId>org.apache.maven.plugins</groupId>
                <artifactId>maven-shade-plugin</artifactId>
                <version>${maven-shade-plugin.version}</version>
                <executions>
                    <execution>
                        <phase>package</phase>
                        <goals>
                            <goal>shade</goal>
                        </goals>
                    </execution>
                </executions>
            </plugin>
            <plugin>
                <groupId>org.apache.maven.plugins</groupId>
                <artifactId>maven-compiler-plugin</artifactId>
                <version>${maven-compiler-plugin.version}</version>
                <configuration>
                    <source>${java.version}</source>
                    <target>${java.version}</target>
                </configuration>
            </plugin>
            <plugin>
                <groupId>org.apache.maven.plugins</groupId>
                <artifactId>maven-clean-plugin</artifactId>
                <version>${maven-clean-plugin.version}</version>
                <configuration>
                    <verbose>true</verbose>
                    <filesets>
                        <fileset>
                            <directory>${basedir}/src/main/gen/gen-java</directory>
                        </fileset>
                    </filesets>
                </configuration>
            </plugin>
        </plugins>
    </build>
</project>
编译完成后可以看到src/main/gen/gen-java下已经按照预定义的包名生成了java源文件,但是使用User.newBuilder创建对象时IDEA提示找不到这个类,此时需要选定gen-java文件夹通过Mark Directory as -> Sources Root标记后才可以使用:

设置完毕后通过如下的小例子进行演示:
package com.w3sun.data;

import com.w3sun.data.bean.Address;
import com.w3sun.data.bean.User;

import java.util.Map;

/**
 * @author: w3sun
 * @date: 2018/12/19 21:08
 * @description:
 */
public class Application {
  public static void main(String[] args) {
    // 设置User基本信息
    User.Builder userBuilder = User.newBuilder();
    long accessTimeMillis = System.currentTimeMillis();
    userBuilder.setName("XiaoMing").setAge(28).setGender("Male").setTimestamp(accessTimeMillis);

    //设置Address基本信息
    Address.Builder addressBuilder = Address.newBuilder();
    addressBuilder.setCity("Chengdu").setCountry("China");
    Map<String, String> properties = addressBuilder.getMutableProperties();
    properties.put("hometown", "Shanghai");
    properties.put("girlfriend", "XiaoHua");
    properties.put("id", "310102200201019590");
    addressBuilder.putAllProperties(properties);

    //构建User实例
    User user = userBuilder.setAddress(addressBuilder).build();
    System.out.println(user);
  }
}
通过mvn clean package -DskipTests进行打包,然后手动执行下java -cp protobuf-Integration-1.0-SNAPSHOT.jar com.w3sun.data.Application进行检验:
java -cp protobuf-Integration-1.0-SNAPSHOT.jar com.w3sun.data.Application
name: "XiaoMing"
age: 28
gender: "Male"
timestamp: 1545225018270
address {
  city: "Chengdu"
  country: "China"
  properties {
    key: "hometown"
    value: "Shanghai"
  }
  properties {
    key: "girlfriend"
    value: "XiaoHua"
  }
  properties {
    key: "id"
    value: "310102200201019590"
  }
}
本地未安装Protoc
xolstice.org出品的protobuf-maven-plugin与maven-antrun-plugin相比使用起来更为方便而且pom.xml设置上也更为简单一些。为了演示该插件的强大功能,本小节示例中将对pom.xml进行精简。
<?xml version="1.0" encoding="UTF-8"?>
<project xmlns="http://maven.apache.org/POM/4.0.0"
         xmlns:xsi="http://www.w3.org/2001/XMLSchema-instance"
         xsi:schemaLocation="http://maven.apache.org/POM/4.0.0 http://maven.apache.org/xsd/maven-4.0.0.xsd">
    <modelVersion>4.0.0</modelVersion>

    <groupId>com.w3sun.data</groupId>
    <artifactId>protobuf-Integration</artifactId>
    <version>1.0-SNAPSHOT</version>

    <properties>
        <java.version>1.8</java.version>
        <protoc.version>3.0.0</protoc.version>
        <protobuf-java.version>3.0.0</protobuf-java.version>
        <os-maven-plugin-version>1.6.2</os-maven-plugin-version>
        <maven-clean-plugin.version>3.1.0</maven-clean-plugin.version>
        <maven-shade-plugin.version>3.1.1</maven-shade-plugin.version>
        <project.build.sourceEncoding>UTF-8</project.build.sourceEncoding>
        <maven-compiler-plugin.version>3.2</maven-compiler-plugin.version>
        <protobuf-maven-plugin-version>0.6.1</protobuf-maven-plugin-version>
        <project.reporting.outputEncoding>UTF-8</project.reporting.outputEncoding>
    </properties>

    <dependencies>
        <dependency>
            <groupId>com.google.protobuf</groupId>
            <artifactId>protobuf-java</artifactId>
            <version>${protobuf-java.version}</version>
        </dependency>
    </dependencies>

    <build>
        <sourceDirectory>${basedir}/src/main/java</sourceDirectory>
        <testSourceDirectory>${basedir}/src/test/java</testSourceDirectory>
        <extensions>
            <extension>
                <groupId>kr.motd.maven</groupId>
                <artifactId>os-maven-plugin</artifactId>
                <version>${os-maven-plugin-version}</version>
            </extension>
        </extensions>
        <plugins>
            <plugin>
                <groupId>org.xolstice.maven.plugins</groupId>
                <artifactId>protobuf-maven-plugin</artifactId>
                <version>${protobuf-maven-plugin-version}</version>
                <configuration>
                    <protocArtifact>
                        com.google.protobuf:protoc:${protoc.version}:exe:${os.detected.classifier}
                    </protocArtifact>
                </configuration>
                <executions>
                    <execution>
                        <id>compile</id>
                        <goals>
                            <goal>compile</goal>
                            <!--<goal>compile-custom</goal>-->
                        </goals>
                    </execution>
                    <execution>
                        <id>test-compile</id>
                        <goals>
                            <goal>test-compile</goal>
                            <!--<goal>test-compile-custom</goal>-->
                        </goals>
                    </execution>
                </executions>
            </plugin>
            <plugin>
                <groupId>org.apache.maven.plugins</groupId>
                <artifactId>maven-shade-plugin</artifactId>
                <version>${maven-shade-plugin.version}</version>
                <executions>
                    <execution>
                        <phase>package</phase>
                        <goals>
                            <goal>shade</goal>
                        </goals>
                    </execution>
                </executions>
            </plugin>
            <plugin>
                <groupId>org.apache.maven.plugins</groupId>
                <artifactId>maven-compiler-plugin</artifactId>
                <version>${maven-compiler-plugin.version}</version>
                <configuration>
                    <source>${java.version}</source>
                    <target>${java.version}</target>
                </configuration>
            </plugin>
            <plugin>
                <groupId>org.apache.maven.plugins</groupId>
                <artifactId>maven-clean-plugin</artifactId>
                <version>${maven-clean-plugin.version}</version>
                <configuration>
                    <verbose>true</verbose>
                </configuration>
            </plugin>
        </plugins>
    </build>
</project>
其中os-maven-plugin主要用来获取操作系统相关的信息,自动检测运行系统版本,填入 os.detected.classifier属性,配合protobuf-maven-plugin插件使用,自动从maven仓库下载对应的proto编译器。IDEA run选项卡会展示CPU架构、操作系统名称及操作系统版本等信息。
[INFO] Detecting the operating system and CPU architecture
[INFO] ------------------------------------------------------------------------
[INFO] os.detected.name: linux
[INFO] os.detected.arch: x86_64
[INFO] os.detected.version: 4.13
[INFO] os.detected.version.major: 4
[INFO] os.detected.version.minor: 13
[INFO] os.detected.release: ubuntu
[INFO] os.detected.release.version: 16.04
[INFO] os.detected.release.like.ubuntu: true
[INFO] os.detected.release.like.debian: true
[INFO] os.detected.classifier: linux-x86_64
确定配套的protoc编译器版本:<protocArtifact> com.google.protobuf:protoc:${protoc.version}:exe:${os.detected.classifier} </protocArtifact>,而且依赖在maven仓库中可见,例如https://maven.aliyun.com/中。

需要注意的是如果用户没有指定.proto文件的位置protobuf-maven-plugin插件中默认会在${basedir}/src/main/proto文件下进行查找,生成的源文件在用户不指定的情况下默认位于:
./
+- pom.xml
+- src/
   +- main/
      +- proto/
         +- message.proto
   +- test/
      +- proto/
         +- test_message.proto
${basedir}/target/generated-sources/protobuf/java中,重新打包并通过可用性验证。
protobuf-maven-plugin插件功能非常强大,除了基本的编译功能外还支持用户自定义.proto文件位置和编译后源码的输出位置,同时考虑到某些公司可能基于某个Protobuf版本进行bug修复或者二次开发还允许用户指定protoc编译器。
自定义输入输出位置
<plugin>
    <groupId>org.xolstice.maven.plugins</groupId>
    <artifactId>protobuf-maven-plugin</artifactId>
    <version>${protobuf-maven-plugin-version}</version>
    <configuration>
        <includes>
            <include>**/*.proto</include>
        </includes>
        <protoSourceRoot>${basedir}/proto</protoSourceRoot>
        <outputDirectory>${basedir}/src/main/gen/gen-java</outputDirectory>
        <protocArtifact>
            com.google.protobuf:protoc:${protoc.version}:exe:${os.detected.classifier}
        </protocArtifact>
    </configuration>
    <executions>
        <execution>
            <id>compile</id>
            <goals>
                <goal>compile</goal>
            </goals>
        </execution>
        <execution>
            <id>test-compile</id>
            <goals>
                <goal>test-compile</goal>
            </goals>
    	</execution>
    </executions>
</plugin>
如果对代码有洁癖,每次编译都想删除此前生成的java源代码可以配合maven-clean-plugin使用。
<plugin>
    <groupId>org.apache.maven.plugins</groupId>
    <artifactId>maven-clean-plugin</artifactId>
    <version>${maven-clean-plugin.version}</version>
    <configuration>
        <verbose>true</verbose>
        <filesets>
            <fileset>
                <directory>${basedir}/src/main/gen/gen-java</directory>-->
            </fileset>
        </filesets>
    </configuration>
</plugin>
指定并使用本地protoc
用户指定本地protoc编译器时不再使用os-maven-plugin可以从pom中移除。
<plugin>
    <groupId>org.xolstice.maven.plugins</groupId>
    <artifactId>protobuf-maven-plugin</artifactId>
    <version>${protobuf-maven-plugin-version}</version>
    <configuration>
        <includes>
            <include>**/*.proto</include>
        </includes>
        <protoSourceRoot>${basedir}/proto</protoSourceRoot>
        <outputDirectory>${basedir}/src/main/gen/gen-java</outputDirectory>
        <protocExecutable>/usr/local/bin/protoc</protocExecutable>
    </configuration>
    <executions>
        <execution>
            <id>compile</id>
            <goals>
                <goal>compile</goal>
                <!--<goal>compile-custom</goal>-->
            </goals>
        </execution>
        <execution>
            <id>test-compile</id>
            <goals>
                <goal>test-compile</goal>
                <!--<goal>test-compile-custom</goal>-->
            </goals>
        </execution>
    </executions>
</plugin>
IDEA Protobuf插件
IDEA默认不支持.proto文件语法高亮显示,用户可以通过jetbrains插件仓库查找和安装相关插件进行.proto文件的格式化显示。笔者自己使用的是Protobuf Support
感兴趣的可以通过插件仓库安装如果网速较慢可以直接到官网下载。需要注意的是IDEA版本要高于插件版本,不然会出错。插件与IDEA对应关系如下:
| Plugin Version | IDE Version Range |
|---|---|
| 0.11.0 | IDEA 2018.2 |
| 0.9.0 | IDEA 2017.1 |
| 0.8.0 | IDEA 2016.1 |
| 0.6.0 | IDEA 13 – IDEA 15 |
THIS PLUGIN IS NOT SUPPORTED SINCE 2019
PLEASE SWITCH TO https://github.com/jvolkman/intellij-protobuf-editor
感兴趣的读者可以自己研究下新插件的功能。
参考文献
https://maven.aliyun.com/mvn/search
https://github.com/trustin/os-maven-plugin
https://developers.google.com/protocol-buffers
https://github.com/protostuff/protobuf-jetbrains-plugin
https://plugins.jetbrains.com/plugin/8277-protobuf-support
https://github.com/jvolkman/intellij-protobuf-editor
https://www.xolstice.org/protobuf-maven-plugin/compile-mojo.html
转载请注明:雪后西塘 » Maven插件整合Protobuf