目录
环境准备
CentOS-6.9-x86_64
或者可以下载Putty完整版
https://the.earth.li/~sgtatham/putty/latest/w64/putty.zip
修改登陆端口
为了安全起见,本人一般会将SSH默认登陆端口22修改为其他端口:
[root@hostname ~]# vi /etc/ssh/sshd_config
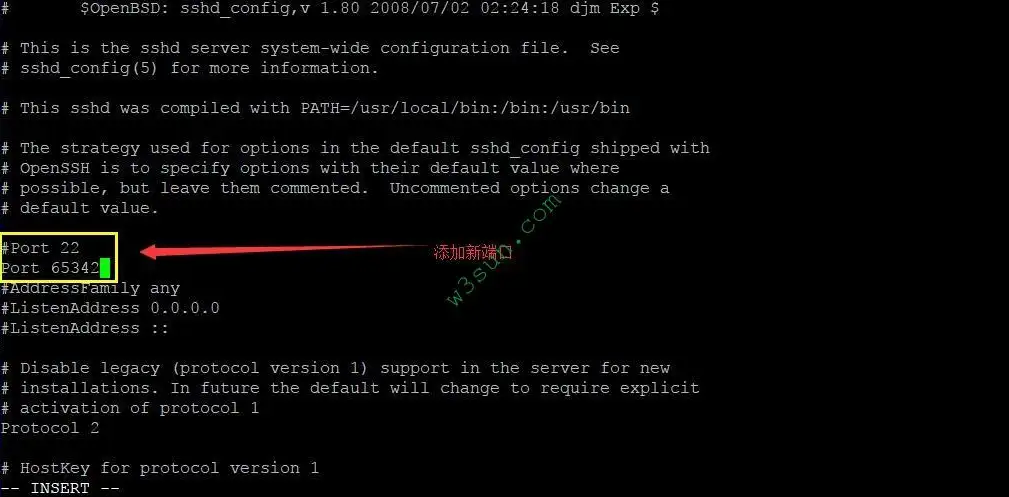
完成以后保存退出并重启ssh服务即可:
[root@hostname ~]# service sshd restart
当前终端Session仍然可用,请关闭终端软件并重新打开一个Session进行验证。
生成秘钥
登陆服务器并进入root目录,由于服务器尚未配置ssh秘钥登陆因此root目录上没有.ssh目录,即使不手动创建该目录在生成秘钥的过程中系统也会自动创建:
[root@hostname ~]# ls -al
total 32
dr-xr-x---  2 root root 4096 Jan  8 15:45 .
drwxr-xr-x 22 root root 4096 Jan  8 15:40 ..
-rw-------  1 root root  249 Jan  8 15:42 .bash_history
-rw-r--r--  1 root root   18 May 20  2009 .bash_logout
-rw-r--r--  1 root root  176 May 20  2009 .bash_profile
-rw-r--r--  1 root root  176 Sep 23  2004 .bashrc
-rw-r--r--  1 root root  100 Sep 23  2004 .cshrc
-rw-r--r--  1 root root  129 Dec  3  2004 .tcshrc
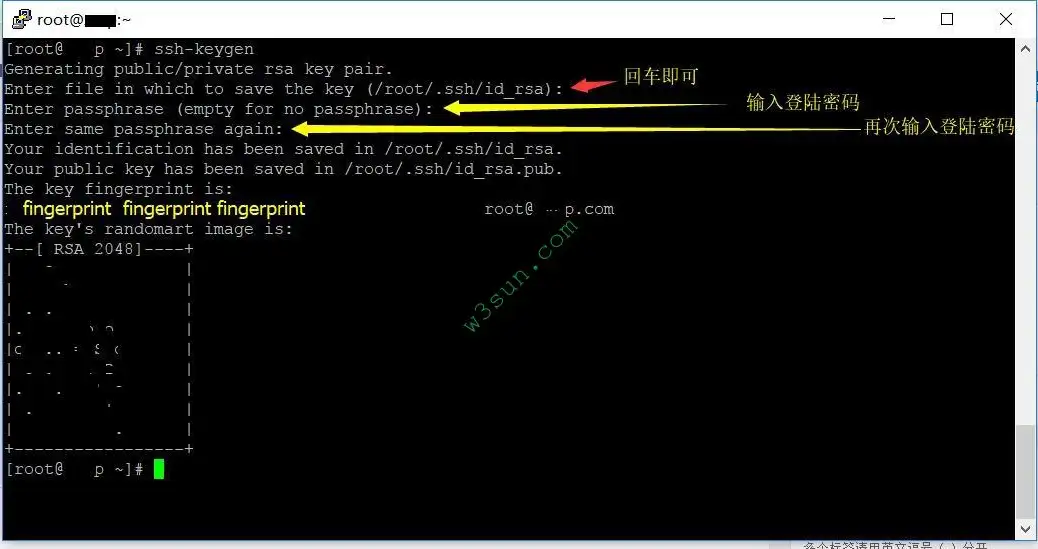
秘钥生成完毕以后,进入.ssh目录进行查看:
[root@hostname ~]# ls -al
total 36
dr-xr-x---  3 root root 4096 Jan  8 16:04 .
drwxr-xr-x 22 root root 4096 Jan  8 15:40 ..
-rw-------  1 root root  249 Jan  8 15:42 .bash_history
-rw-r--r--  1 root root   18 May 20  2009 .bash_logout
-rw-r--r--  1 root root  176 May 20  2009 .bash_profile
-rw-r--r--  1 root root  176 Sep 23  2004 .bashrc
-rw-r--r--  1 root root  100 Sep 23  2004 .cshrc
drwxr-xr-x  2 root root 4096 Jan  8 16:07 .ssh
-rw-r--r--  1 root root  129 Dec  3  2004 .tcshrc
[root@hostname ~]# cd .ssh
[root@hostname .ssh]# ls -al
total 16
drwxr-xr-x 2 root root 4096 Jan  8 16:07 .
dr-xr-x--- 3 root root 4096 Jan  8 16:04 ..
-rw------- 1 root root 1743 Jan  8 16:07 id_rsa
-rw-r--r-- 1 root root  395 Jan  8 16:07 id_rsa.pub
[root@hostname .ssh]#
将id_rsa和id_rsa.pub下载到本地备份,如果秘钥丢了后续还可以再生成但是需要确保备份安全,本文采用filezilla完成公钥和私钥下载。

修改sshd_config配置文件
将id_rsa.pub拷贝一份或者重命名为authorized_keys,并将其权限修改为600:
[root@hostname .ssh]# cp id_rsa.pub authorized_keys
[root@hostname .ssh]# ls -al
total 20
drwxr-xr-x 2 root root 4096 Jan  8 16:46 .
dr-xr-x--- 3 root root 4096 Jan  8 16:04 ..
-rw-r--r-- 1 root root  395 Jan  8 16:46 authorized_keys
-rw------- 1 root root 1743 Jan  8 16:07 id_rsa
-rw-r--r-- 1 root root  395 Jan  8 16:07 id_rsa.pub
[root@hostname .ssh]# chmod 600 authorized_keys
[root@hostname .ssh]# ls -al
total 20
drwxr-xr-x 2 root root 4096 Jan  8 16:46 .
dr-xr-x--- 3 root root 4096 Jan  8 16:04 ..
-rw------- 1 root root  395 Jan  8 16:46 authorized_keys
-rw------- 1 root root 1743 Jan  8 16:07 id_rsa
-rw-r--r-- 1 root root  395 Jan  8 16:07 id_rsa.pub
[root@hostname .ssh]# vi /etc/ssh/sshd_config

#打开下面3个的注释并进行相关设置
#启用密钥验证
RSAAuthentication yes
PubkeyAuthentication yes
PasswordAuthentication no
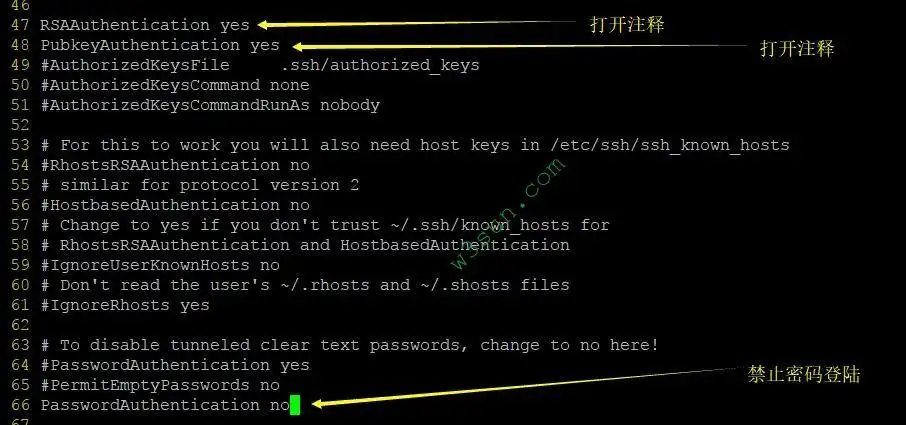
配置完毕后需要重启ssh服务方可生效。
客户端配置
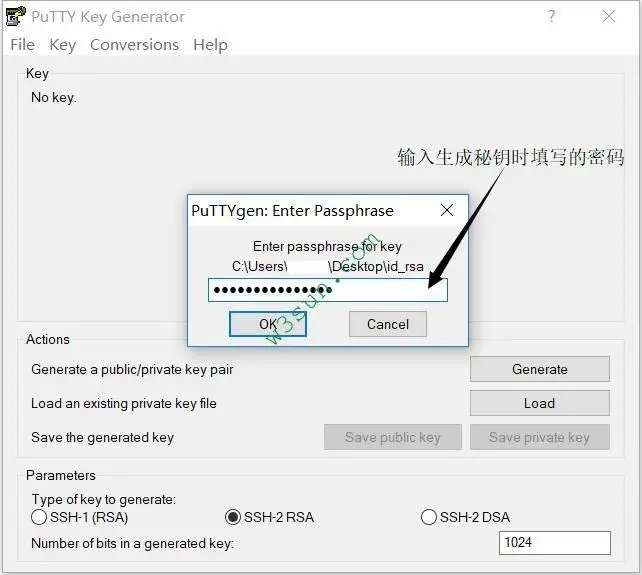
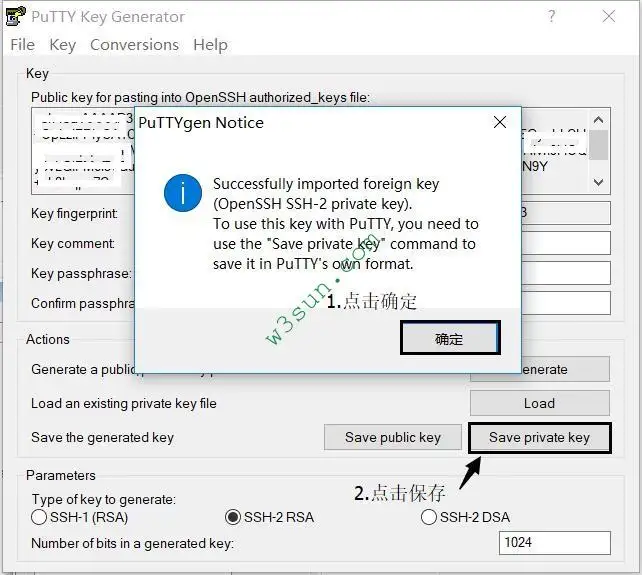
Putty无法识别从服务器上拷贝的私钥,需要使用PuTTYgen生成.ppk私钥:
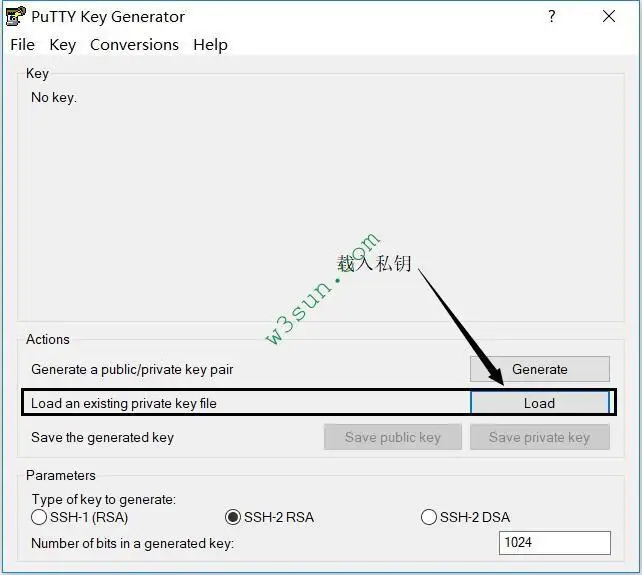
配置Putty
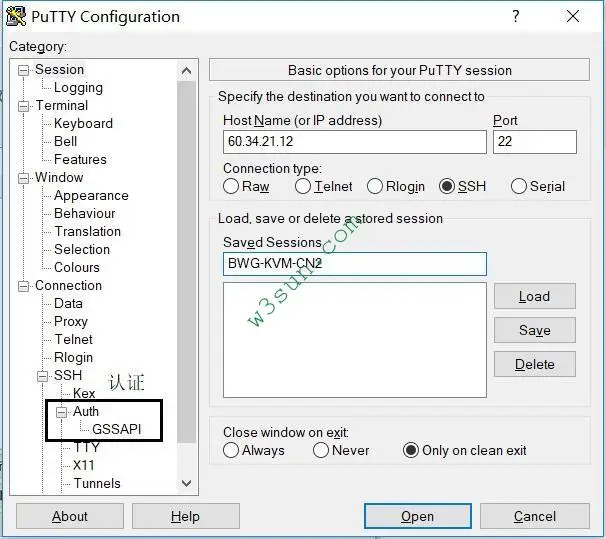
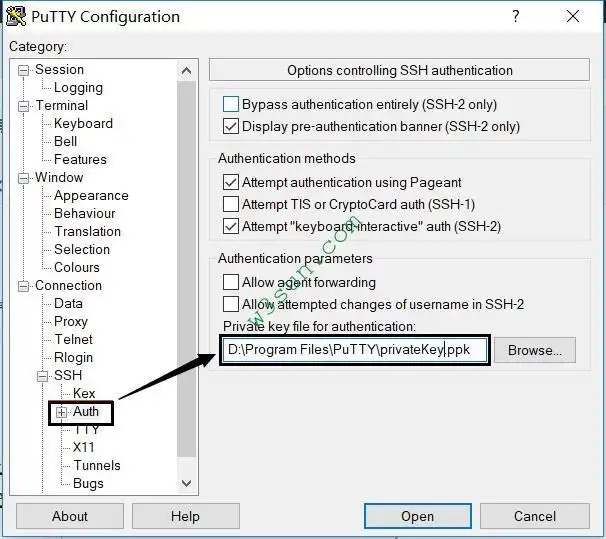
生成的ppk私钥文件需要加入Putty认证模块才能生效:
验证
login as: root #用户名
Authenticating with public key "imported-openssh-key"
Passphrase for key "imported-openssh-key": #密码
Last login: Mon Jan  8 15:45:13 2018 from 151.16.63.25
[root@hostname ~]#
防火墙开启下的配置
为了安全建议开启防火墙,此时在更改/etc/ssh/sshd_config的情况下还需要放行自定义的SSH登陆端口
[root@hostname ~]# yum -y install policycoreutils-python //或者执行yum -y install policycoreutils-python.x86_64
[root@hostname ~]# semanage port -a -t ssh_port_t -p tcp 65342
[root@hostname ~]# firewall-cmd --permanent --zone=public --add-port=65342/tcp
[root@hostname ~]# systemctl restart firewalld //或者执行firewall-cmd --reload
由于CentOS lifecycle马上结束了,如果选择了Alma Linux替代品的同学可以通过如下命令安装policycoreutils:
[root@hostname ~]# yum -y install epel-release
[root@hostname ~]# dnf install policycoreutils-python-utils
设置完成后记得要更新系统以修复部分软件Bug
[root@hostname ~]# yum update -y
转载请注明:雪后西塘 » Putty设置SSH秘钥登陆并更改默认22端口